Friday, March 19, 2010

While The Cat's Away...

Lincoln recently had to travel to Boston for a few days for work. While I was sad to see him go, I was excited to start working on a project while he was gone to surprise him.
I hatched my plan a couple weeks ahead of time. I started squirreling money away and looking for accomplices to aid me in my scheme. Once I had my cousin, Karen, and her husband Jamie on board, I started to get really excited. My plan? To build a room in the unfinished basement.
I knew we wouldn't be able to complete it in the three days, but i figured it would be pretty fun to at least get it framed up.
Karen and Jamie came by a few days before Lincoln left and the three of us laid out our plan. With Jamie's professional, or at least, experience-based advice, we decided which room to start on and came up with a materials list. Lincoln left on Sunday, and Monday morning Jamie and I went to the home improvement store to pick up all the materials. On the way back into town, we stopped at the town hall and I acquired our building permit.
We returned home and unloaded the truck, with the assistance of Karen and our friend Billy. Jamie has some severe physical limitations due to a serious work injury a few years back, so we determined that we had accomplished enough for day one. That evening, our friend Doug came by to assess whether he felt he could do the electrical for us or not. He was sure he could and told me to let him know when we were ready for him.
On day 2, Jamie, with a little assistance from Karen and I, framed up the room almost in its entirety. I called Doug and told him we were ready and he came by that evening and put in all the electrical.
On day 3, the building inspector came to check the electrical. He determined we needed to change a couple things, but overall was pleased. Karen and Jamie came in the morning and framed up the closet.
Lincoln arrived home late that night and was surprised to see a building permit in our window, but not nearly as surprised as when he saw a room taking shape in the basement.
On day 4, yesterday, Jamie came over to put in a few nailers. Doug and the building inspector came at noon to talk through the electrical plans.
Tonight we will pick up what we need to tap into our HVAC and run heat and a cold air return. Hopefully that will go in tomorrow morning, then we can move on to drywall.
I'm looking forward to documenting our progress on this blog. This is soooo fun! OH! And the best news is that the window I thought was too small to meet code for a bedroom, isn't. So we can OFFICIALLY call it a fourth bedroom! Hurray!
(This is what the basement looked like when we first looked at the house.)


The rest of the pictures are of the new room.


(As you can see, unlike the previous fitness- and cleanliness-minded homeowners, we use the space as a dumping ground for dead furniture.)


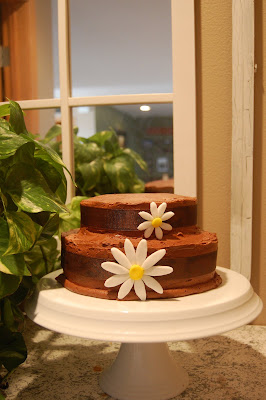
Daisy Cake


I made this little daisy cake for a dinner at church tonight. I think it turned out pretty darn cute! It's chocolate cake with chocolate frosting, with a hidden pool of chocolate pudding inside. I've never tried that before, so I hope it turned out OK. I made chocolate pudding just like I would for a chocolate pie, but instead of pouring it into a pie shell, I poured it into a well in the center of the bottom cake. I refrigerated it overnight so it would set up, then assembled and decorated today.


Thursday, March 4, 2010

The Dining Room

So along with this decorating change I talked about yesterday, I decided I really wanted to lighten and brighten the dining room. So let's look at past dining rooms, the current dining room in its before state, and where it is now, still a work in progress, I'd say.

Let's start with our last house. I have a picture of the dining room that I remembered to snap after I had started taking down the horrendous wallpaper border. The floor was carpeted in a lovely mauve. Ugh.


Unfortunately, my good after pictures are lurking in my old computer, waiting for us to find a way to free them. So this is all I have. We painted the trim white, sage green under the chair rail throughout the house, and in this room, a lovely red on top. I spray-painted the light fixture in a hammered metal finish and ended up with lots of compliments on it. If you look in the corner you can see that at that point we just had exposed sub-floor. We later installed beautiful Brazilian Koa wood floors. I wish I could get my hands on a picture...


Now we can look at our current house. The dining room is part of an open concept floor plan, open to the kitchen and living room. We didn't paint the walls, just added our reds and greens and golds. Warm, but a bit heavy and getting rather tiresome. And although the light fixture is nice and fairly up to date, we've never really liked it much. It's just not us.


So, here's what I'm working on. I found this light fixture at the Habitat For Humanity ReStore for $8.00. I liked the simplicity of it, but hate the brass. But I had been searching for something like it to redo. So here it is in progress.


My husband does not like the fake candle look of these candelabra style fixtures, so I ended up taking the tape off the candles and painting them oil rubbed bronze as well. Now it just looks like the whole piece is metal.


I switched out the items in the china hutch to mostly white pieces, as well as the plates in the wall hanging.


You can also see in that picture that I replaced the heavy, dark curtains with some nice light, airy ones from Ikea.

So, overall, a lighter, brighter look. I'm hoping to do some trim and molding work eventually, as well as few more decorating touches. (I've painted the picture frame to the left of the hutch in black. What a HUGE difference. I love it. I'll get a picture up soon.) But so far, we're loving it.

Wednesday, March 3, 2010

Redecorating

I've decided it's time to shake things up a bit. My decor, though it has been added to here and there, has been basically the same for quite some time. I love the look of red accents in the home. Along with some sage green and some warm yellows, my home has been cozy and colorful for some time now. BUT, I was ready for something new and fresh. Along with that, I have been more and more drawn to pieces of furniture with some history. Inspired by fun and funky Victorian sofas I had seen online, I started a Craigs List hunt for a piece i could redo. Along the journey, I found out how expensive it would be to hire a reupholsterer. So it became necessary to find one that I wouldn't HAVE to redo immediately. Something I could live with as-is until I get the courage, time, and money for fabric to recover it myself- hopefully with my Mom's assistance. I think I found a beaut.


Thursday, February 25, 2010

Valentine's Day Stuff

Goodness, it has been a while. It's not for lack of projects. I'm just too busy to blog lately, it seems. I thought I'd share a couple little items I did for our Valentine's Day Party.

First up is this glitter heart. I really liked some of the graphic hearts I was finding online this year. At the last minute I threw this one together.


I had this frame kicking around. It's one that I grabbed from my parents' basement last summer when us kids were helping them clear out and process tons of stuff. I cut out a rectangle from a cereal box and covered it with a piece of fabric cut from a drop cloth. I cut out a large heart from the other side of the cereal box, applied spray adhesive and dumped on glitter. When it dried I shook off the excess, sprayed again and applied more glitter. I repeated the process until it was covered to the extent I was looking for. Then I applied one more coat of spray adhesive to kind of seal the whole thing and keep it from shedding glitter. A little bit of jute twine around the circumference of the heart gave it a nice finished edge. I love how it turned out. Simple, but festive and a little bit glamour meets shabby.

Inspired by a cake made by Bakerella, I made this Box of Chocolates cake for our party.


Nowhere near as pretty as Bakerella's but I'm learning with each fondant project I try. So far, I'm learning it takes me 2 tries to get it right. Unfortunately, I don't always have the time or money for 2 tries, so they end up not as good as I know I'm capable of.

And lastly, the Valentine's I made for the kids' parties at school. I made the chocolate pops, but not enough for all three classes. Molding chocolate is a bit time-consuming. I bought a bag of conversation hearts lollipops to make up the difference.


Wednesday, January 27, 2010

Cream Puff Cake

Last night a few friends and I had a small birthday celebration for one of them. I volunteered to bring the cake. When it came time to make the cake, however, I decided I didn't want to do a traditional cake. I was in the mood for something fun and different. I decided to try a recipe I've had for years but had never made: Cream Puff Cake. (I didn't take a picture, this is courtesy of the world wide web. I'm not sure who the credit goes to. Also, mine looked better. ;)).


I thought it was really yummy and it was really easy, so I thought I'd share it here for others to try.

Cream Puff Cake
1 C water
1 stick of butter
1 C flour
1/4 tsp. salt
4 eggs
2 large pkg instant vanilla pudding (Though I found one would have been enough)
1 container of lite cool whip (you can definitely go for lite, fat free, etc with this. The rest is rich enough that you won't even notice.)
Chocolate syrup

Boil water and butter. Add flour and salt, stir with a wooden spoon. Turn the heat down when batter sticks together. Remove from heat and add 4 eggs, one at a time, with wooden spoon. Put in ungreased jelly roll pan (or bar pan or cookie sheet with sides) and bake at 400 degrees for 30 minutes. Crust will be puffy; pat it down and cover with plastic wrap until ready to use. Uncover when ready, then spread with a thick layer of pudding (made according to box directions), then cool whip. Drizzle chocolate syrup on top. (I recommend drizzling more generously than the picture above!)

Monday, December 28, 2009

Christmas Project #2 Renie's Dollhouse Bookcase

I've loved these cute dollhouse bookshelves at Pottery Barn for a long time.

I've not loved the $400 + price tag. (They have taller ones for about $800)

But one day as I was sighing over the picture in the catalog, it struck me. I could totally make one of those things! Then I smartened up and I thought, "No! I can just buy a used bookshelf and with a few modifications, repurpose it into one of those things!"

So I bought this for $5 on Craig's List. It is incredibly solid and sound, and the perfect height.


I cut out some windows and doors, painted it, added a floor to, well, the floor, to cover the hole, added some trim, covered the back wall with beadboard to cover up some cracks in the wood, and added a roof and Voila! A dollhouse bookshelf. I stuck with basic stained wood trim so the piece can grow with her and match any room without needing another paint job.


She loves it and I have to admit, I think it's pretty fun too. The kids' only complaint is that Barbies can't stand in it. But it works well for Loving Family dolls, my original intention, and even Polly Pockets. And Barbies manage to squeeze in as well.

Linking to : Funky Junk Interiors SNS